By vedard
The AES algorithm is widely used to encrypt data of any sort.
It has been battle-tested for many decades and is still recommended as one of the most secure algorithms.
In this article, we will see how AES encryption works and how the algorithm may be implemented by you, too!
The Cipher
There are two fundamental properties to this cipher, namely:
- Diffusion which is about hiding the statistical relationship between the ciphertext and the plaintext.
- If even a single bit is changed in the plaintext, the cipher should change completely.
- Confusion which is about complicating the relationship between the key and the ciphertext with the aim of making cryptanalysis more challenging.
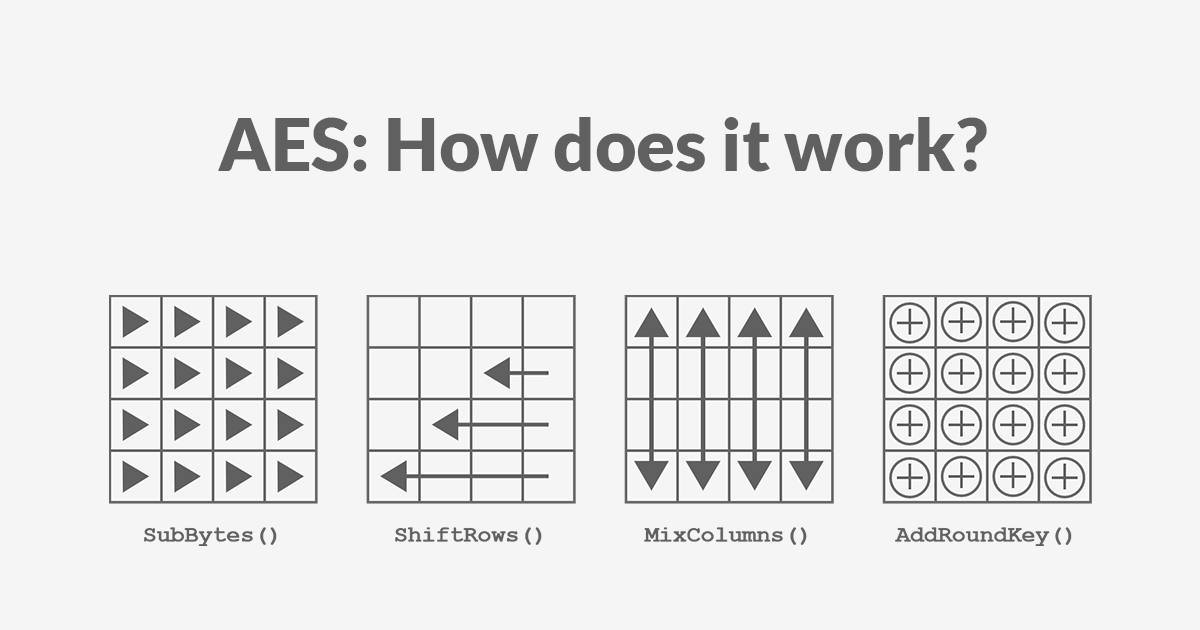
AES encryption consists of 4 “simple” steps that are repeated for several rounds.
Each step on its own does not significantly enhance the algorithm’s security, but by repeating all these steps together multiple times, we increase both the confusion and the diffusion.
The number of rounds depends on the key size, allowing a trade-off between performance and security.
| Key Length (bits) | Number of Rounds |
|---|---|
| 128 | 10 |
| 192 | 12 |
| 256 | 14 |
Each of these steps operates on a block of exactly 16 bytes called the state, which is represented as a 4x4 array:
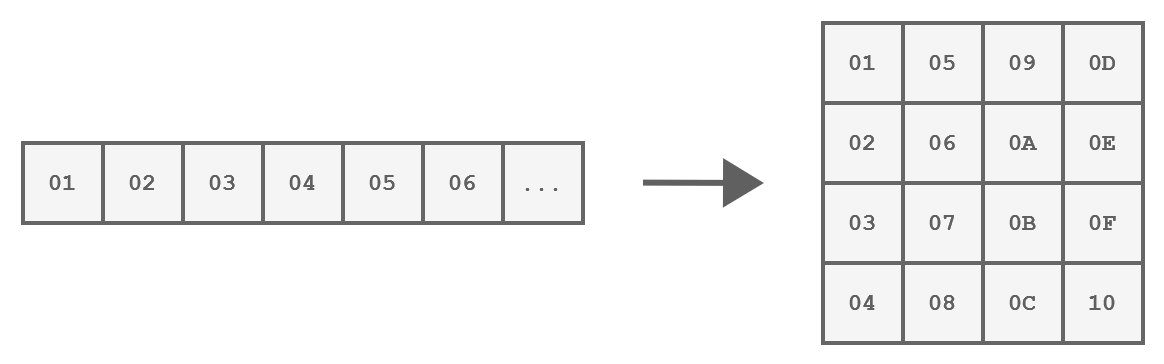
How a block of 16 bytes is represented
These steps are:
- SubBytes
- ShiftRows
- MixColumns
- AddRoundKey
And those operations are implemented in the following way.
We start with an initial AddRoundKey, then we perform each round and in the last round, the MixColumns step is being omitted.
| |
To understand these operations better, let’s take a closer look at each step.
The SubBytes Step
This step is a byte substitution operation that operates on each byte of the state, using a predefined substitution table known as the S-Box.
The purpose of SubBytes is to introduce non-linearity and confusion into the data.
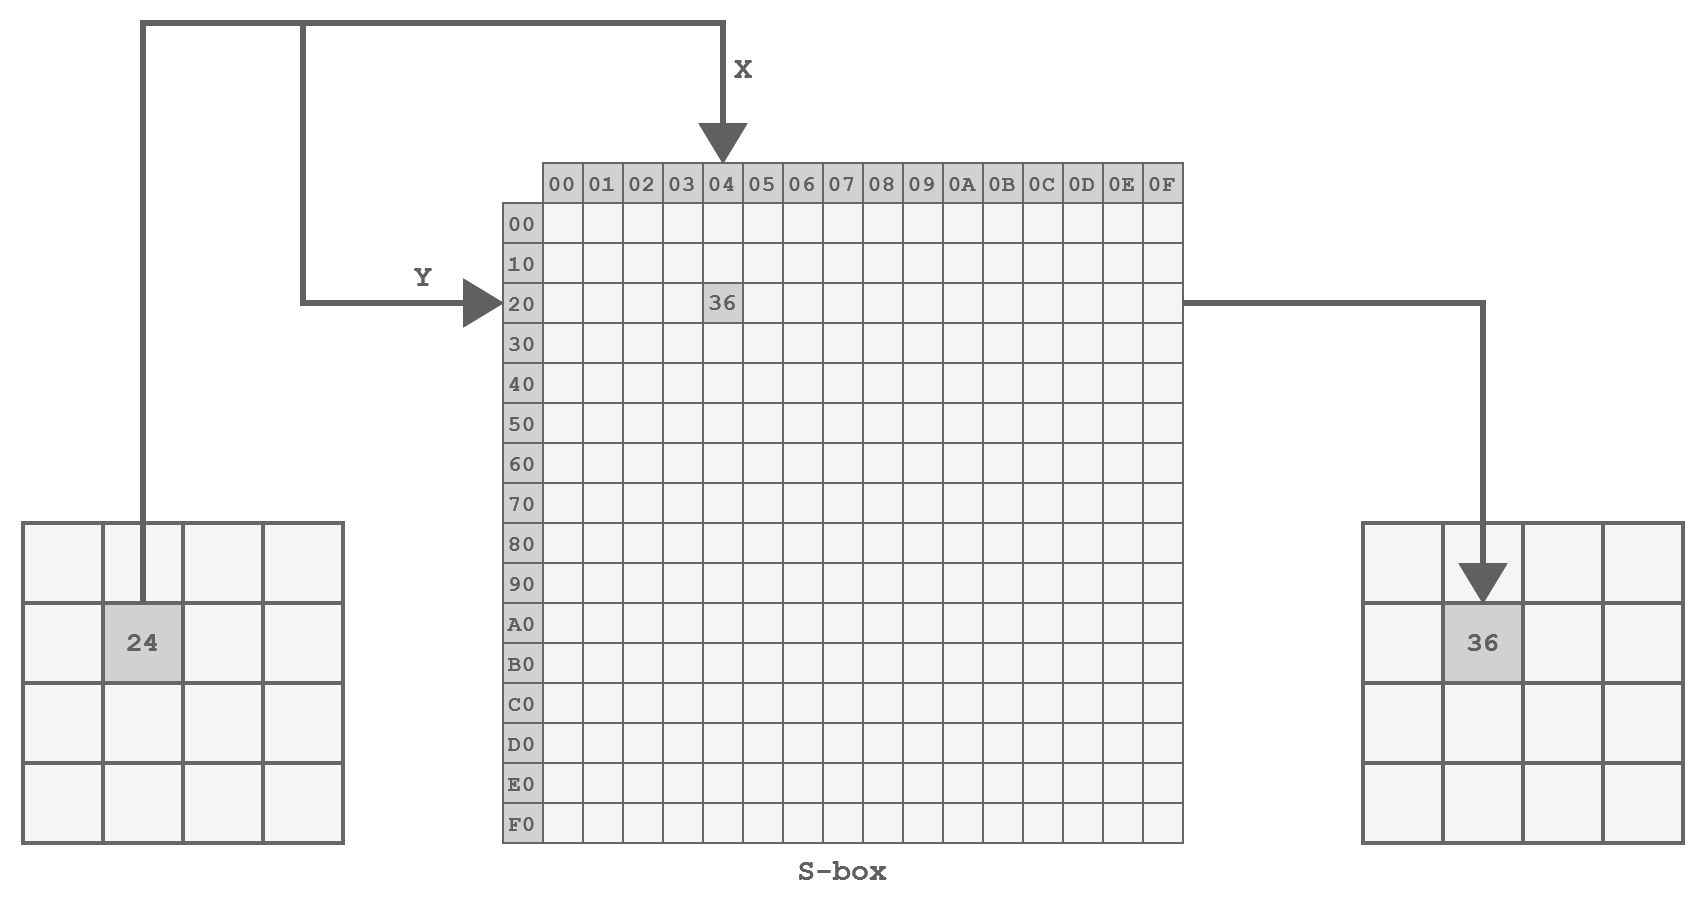
Representation of the SubBytes step
The implementation is straightforward, involving a lookup into a hardcoded table, as follows:
| |
The ShiftRows Step
In this step, the bytes within each row of the state are being shifted left:
- The first row is not touched
- The second row is shifted one position to the left
- The third row is shifted two positions to the left
- The fourth row is shifted three positions to the left.
This operation helps achieve diffusion by spreading bytes across the block.
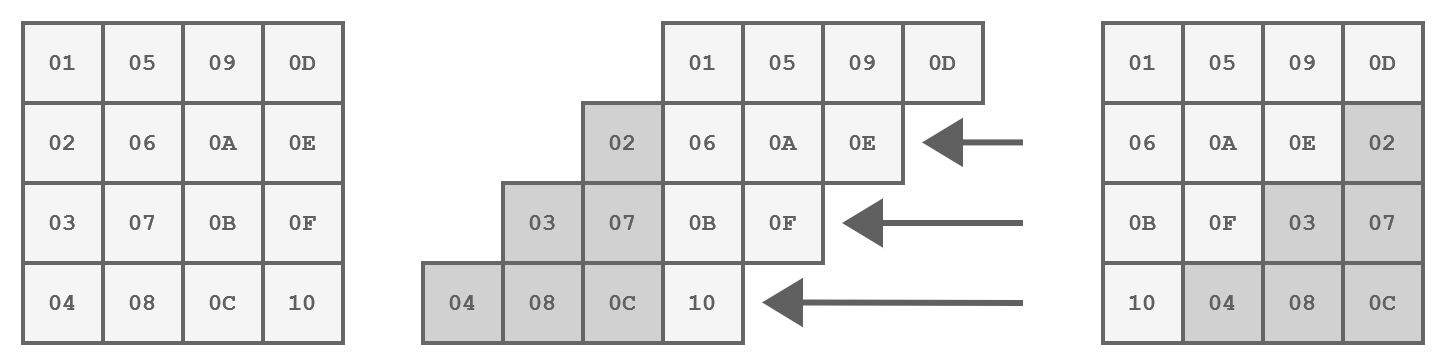
Representation of the ShiftRows step
The code for this step is implemented as follows:
| |
The MixColumns Step
This is the most complex step because it performs mathematical operations in the Galois field, where values range from 0 to 255.
This means that standard operations like addition and multiplication are implemented differently.
The addition is simply a XOR operation, but the multiplication is much more complex and can be done like so:
| |
The MixColumns step involves multiplying each column individually by a matrix.
This has the effect of replacing each byte with a value that depends on all the other bytes in the column increasing - you guessed it - the diffusion.
If we implement the matrix multiplication as is, we get a function similar to this:
| |
However, there is a much more efficient way to implement MixColumns as proposed by the algorithm’s author.
Instead, we will define a function xtime(x) that corresponds to the multiplication by the constant 2 in the Galois field.
| |
Simple, right?
The AddRoundKey Step
In this step, the encryption key is incorporated into the state using a simple bitwise XOR operation:
| |
The Key Expansion
When applying the key in each round, we must always use a different key.
That is why the cipher key is not being used directly but rather a round key, for each round!
These round keys are generated at the very beginning of the process by expanding the cipher key.
The expanded key can be viewed as a multidimensional array with 4 columns, created by combining two previous rows using XOR operations.
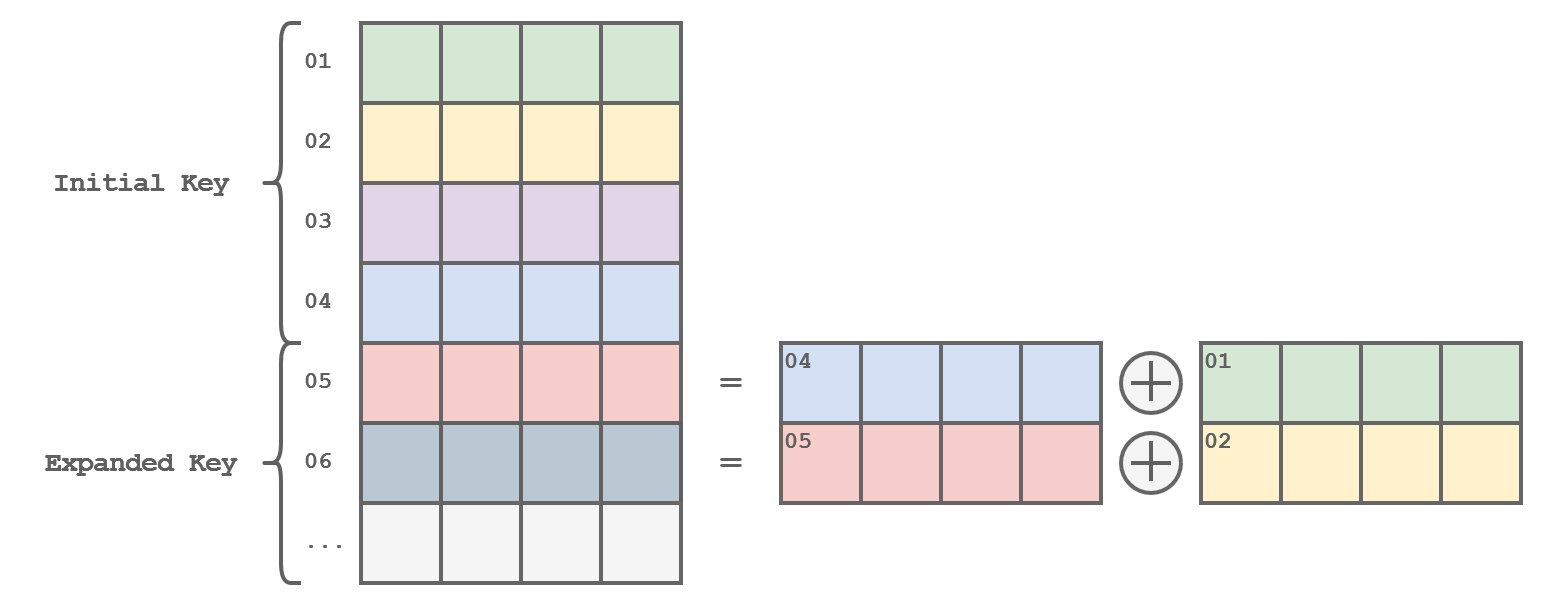
Representation of the Key Expansion
The function would be implemented this way…
| |
…but we are still missing some important steps!
Every time we have generated a completely new key (of the same size as the initial key, of course), we must apply some transformations to the next row:
- Shift the row one byte to the left
- Substitute each byte using the S-Box
- XOR the first byte with a value that varies with each iteration.
| |
If the key is 32 bytes (AES-256), an additional step (SubWord) must be added halfway before the previous transformation.
| |
Which results in this complete example
| |
Mode of operation
So far, we have explored how AES encrypts individual blocks of data.
However, for practical applications like encrypting files or website connections (streams), different modes of operation are needed to handle data larger than 16 bytes.
Electronic Code Book (ECB)
The simplest mode of operation is the Electronic Codebook (ECB), which involves dividing the message into several blocks.
Each block is then simply encrypted using the process we have already seen, which results in faster and more precise handling of each data block which speeds up the whole operation.
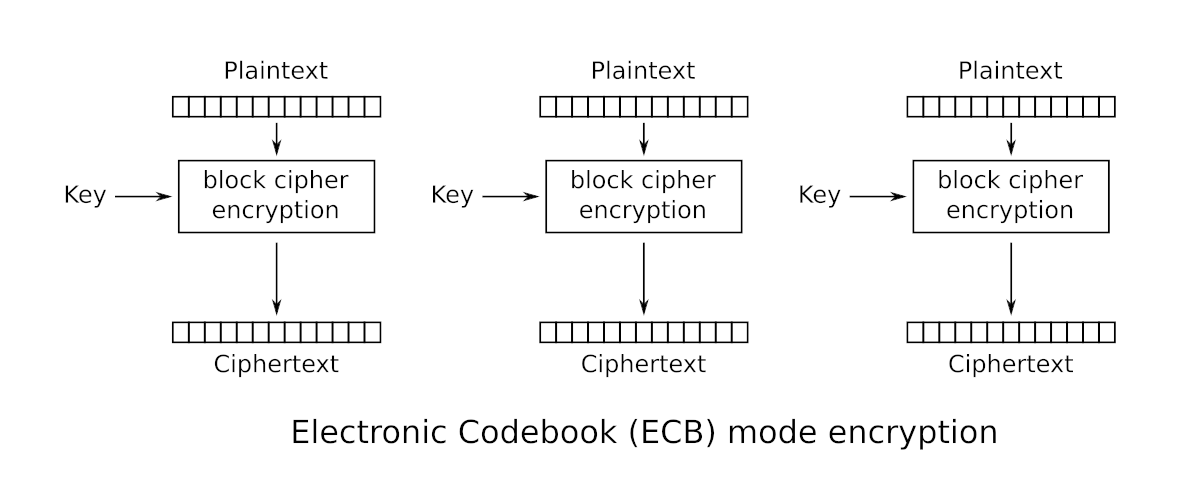
Electronic Code Book (ECB)
Padding
If necessary, padding is added to the last block to ensure that all blocks are of a size of 16 bytes.
Padding is achieved by adding bytes until the last block reaches the desired size.
The value of the added bytes is equal to the number of bytes added.
So, if the last block is composed of 11 bytes, you need to add the value 0x05 five times.
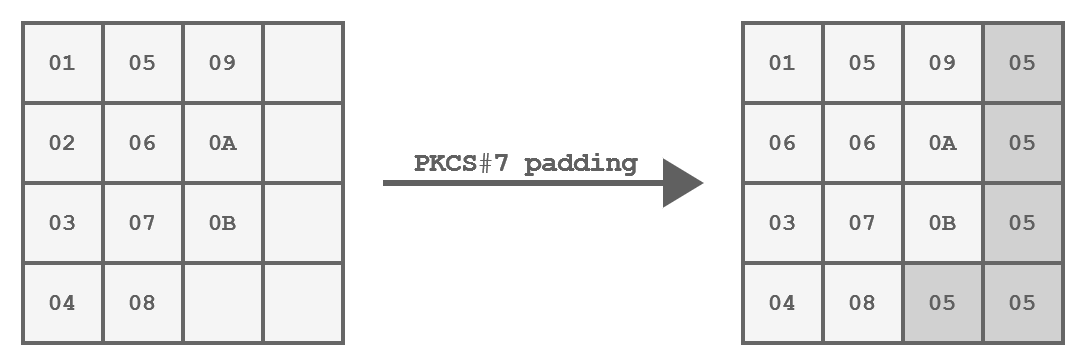
PKCS#7 padding of a 11 bytes block
Like so:
| |
And here is how ECB can be implemented:
| |
A good way to visualize the impact of this problem is to encrypt the raw data of an image:
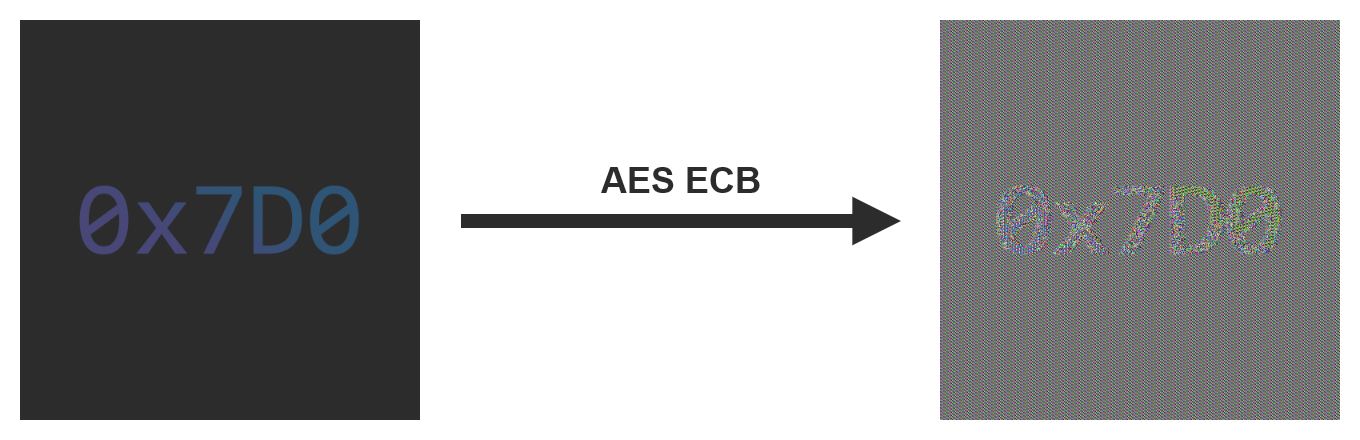
An example of encryption using the ECB mode
Cipher Block Chaining (CBC)
To counter the security issues of Electronic Codebook (ECB), you need a mode of operation that always produces different encrypted blocks.
Cipher Block Chaining (CBC) does meet just that criterion.
Each block is XORed with the previously encrypted block before itself being encrypted.
As the name of the mode implies, you can think of it as a chain where each block depends on the last one.
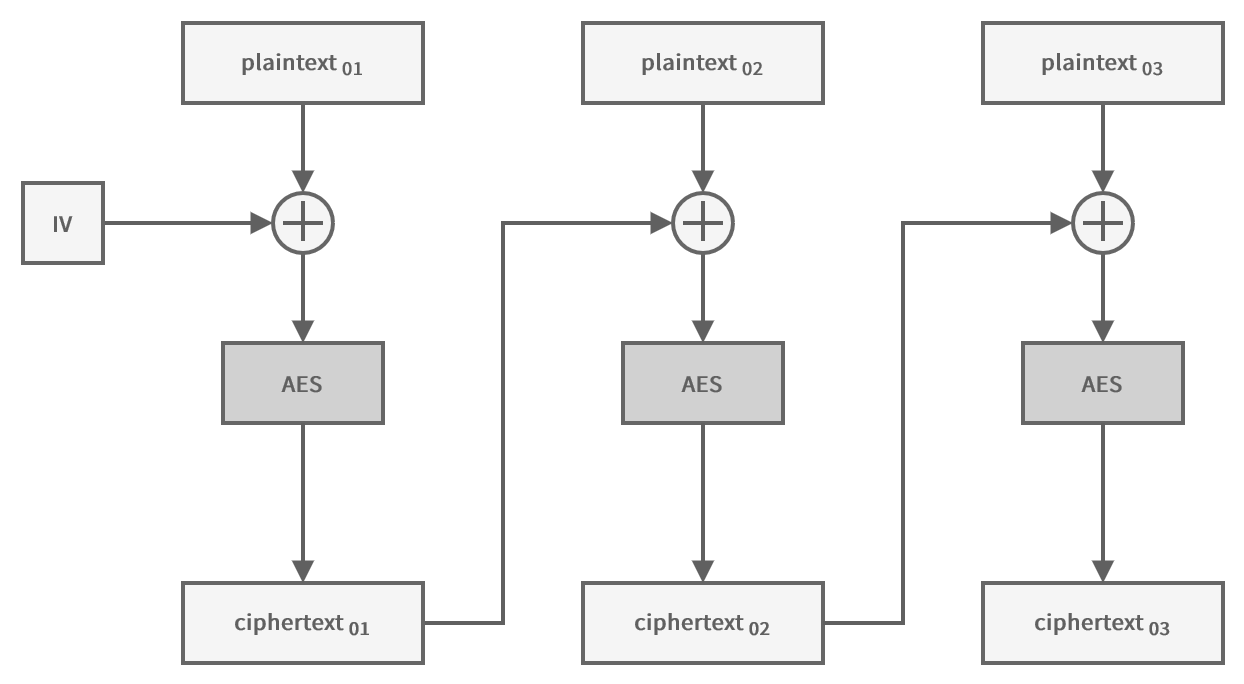
Cipher Block Chaining (CBC)
Like this:
| |
To encrypt the first block of data, you need an initialization vector (IV) of the same size as a block.
This IV can be distributed in clear text along with the ciphertext, but it must be unpredictable and unique!
Therefore, you usually use a random value.
If we take the same image and encrypt it this time using the CBC mode, it is not possible to discern a specific pattern, unlike when using the ECB mode.
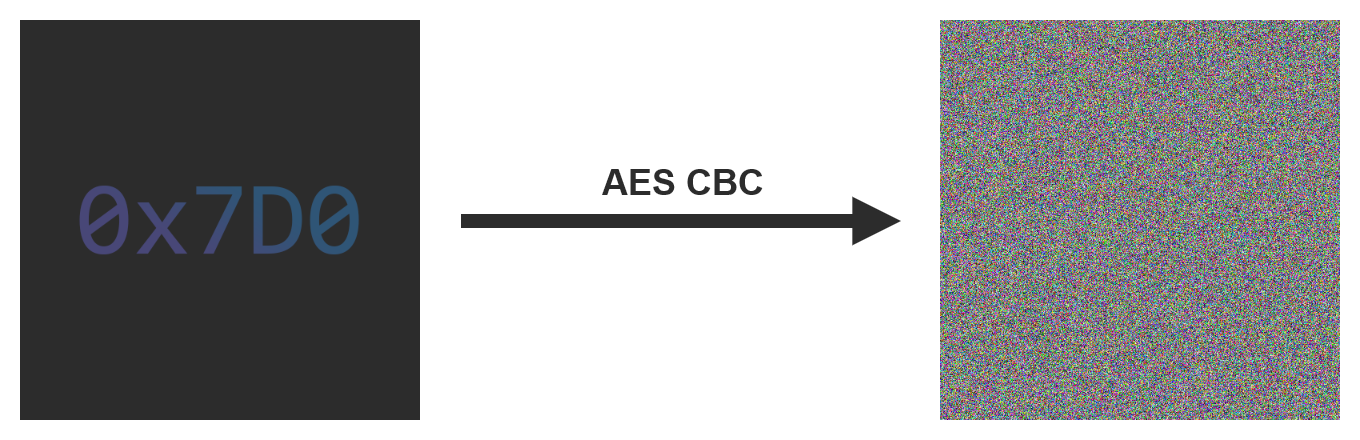
An example of encryption using the CBC mode
Counter (CTR)
Sometimes it is necessary to use a mode of operation that allows encrypting multiple blocks in parallel.
In addition to being faster, this allows encrypting (and especially decrypting) certain parts of the message only without processing the entire message.
In this mode, the initialization vector is used as a counter, which is incremented for each block to avoid encrypting two identical blocks in the same way.
The counter is encrypted and then XORed with the plaintext to produce the ciphertext.
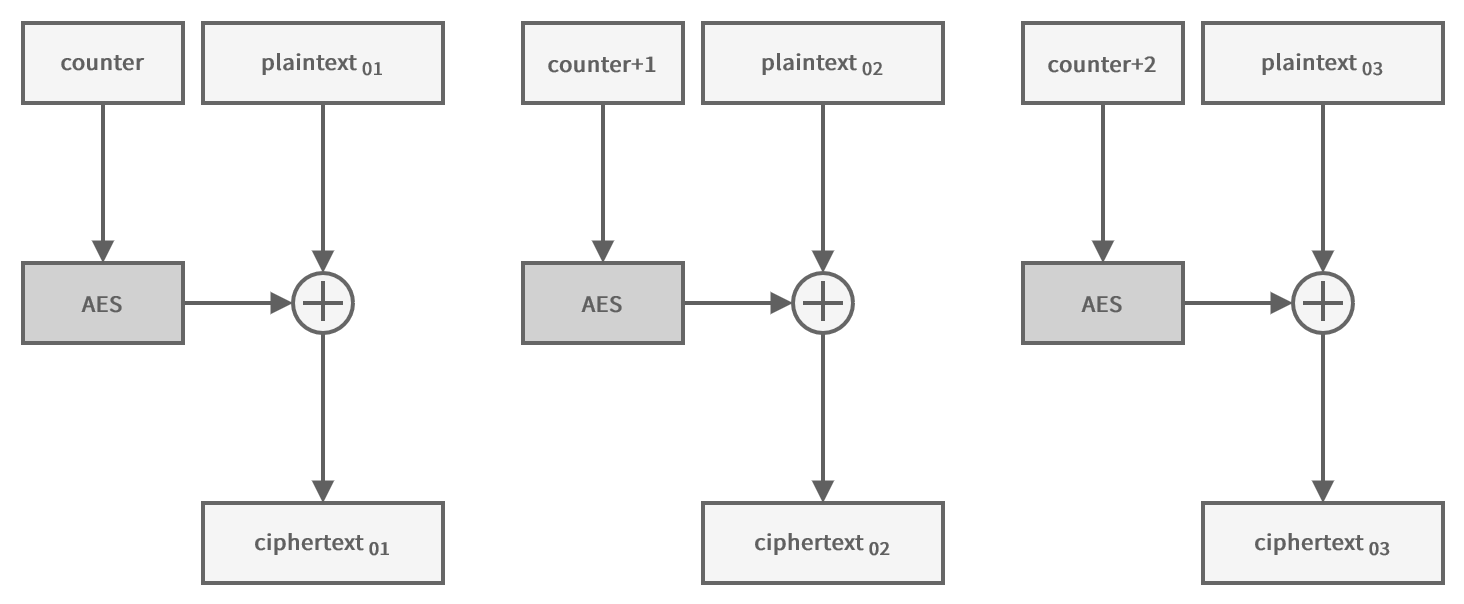
Counter (CTR)
| |
Because the encryption is done on the counter, which is always of a fixed size, it is not necessary to pad the plaintext.
Shoutout
A big shoutout goes to 0x7D0 for the original post which I only adjusted slightly.
Closing thoughts
Thanks for reading.
The complete code is available here.